Starting your drawing journey can feel overwhelming. If you have walked into an art store and see dozens of pencils, erasers, brushes, blending tools, and sketchbooks, you are probably familiar with this feeling.
But do you really need all these materials to learn how to draw? Well, no.
Eventually, if you have discovered yet, that the most expressive and impactful drawings have been created using only a few tools. Check out some of Picasso's later work and you will realize this to be true. The most important thing is understanding how each material works. The better your understanding of the material, the easier it will be manipulate it to create what you want even in a few simple steps.
One of these tool sets are a basic graphite drawing kit.
Iet's explore five important drawing materials: graphite pencils, kneaded erasers, soft drawing brushes, mechanical pencils, and graphite lead refills. You'll learn how to use each tool, common mistakes to avoid, and practical exercises to improve your skills.
1. Graphite Pencils: Understanding Pencil Grades and Their Uses
Graphite pencils are the foundation of traditional pencil drawing.
They contain a mixture of graphite and clay, enclosed in a wooden barrel. The proportion of graphite to clay influences how hard or soft the pencil feels and how dark a mark it produces.
One of the first things every beginner should learn is the graphite pencil grading system.
What Do H, B, and HB Mean?
You've probably noticed pencils labelled 2H, HB, 2B, 4B, 6B, or 8B.
These letters and numbers describe the pencil's hardness and darkness.
H (Hard): Produces lighter marks and generally keeps a fine point longer.
B (Black): Produces darker marks because the graphite core is softer.
HB: A versatile middle-grade pencil suitable for everyday sketching and drawing.
The higher the number before H, the harder and typically lighter the pencil.
The higher the number before B, the softer and generally darker the pencil.
Common Graphite Pencil Grades
Pencil
Characteristics
Best Uses
2H
Hard, light marks
Construction lines and guidelines
H
Light, controlled marks
Preliminary drawing
HB
Medium hardness
General sketching
2B
Soft, moderately dark
Initial shading
4B
Darker, softer graphite
Midtones and shadows
6B
Very soft, dark
Deep shadows
8B
Extremely soft, dark
Rich dark accents
How to Use Graphite Pencils Correctly
One of the biggest mistakes beginners make is pressing too hard with their pencils.
When you press heavily, you can create indentations in the paper. These grooves become difficult to remove and may show through later shading. They also create a shinny effect on the drawing is distracting.
It is important to begin with light pressure and gradually build darker values.
For example, when drawing a realistic sphere, start by outlining its basic shape using an HB pencil.
Next, establish the main shadow using a 2B pencil. Gradually introduce darker values using 4B and 6B pencils.
Reserve your darkest pencil for areas where light is almost completely absent.
This technique is called layering, and it is essential for creating realistic graphite drawings.
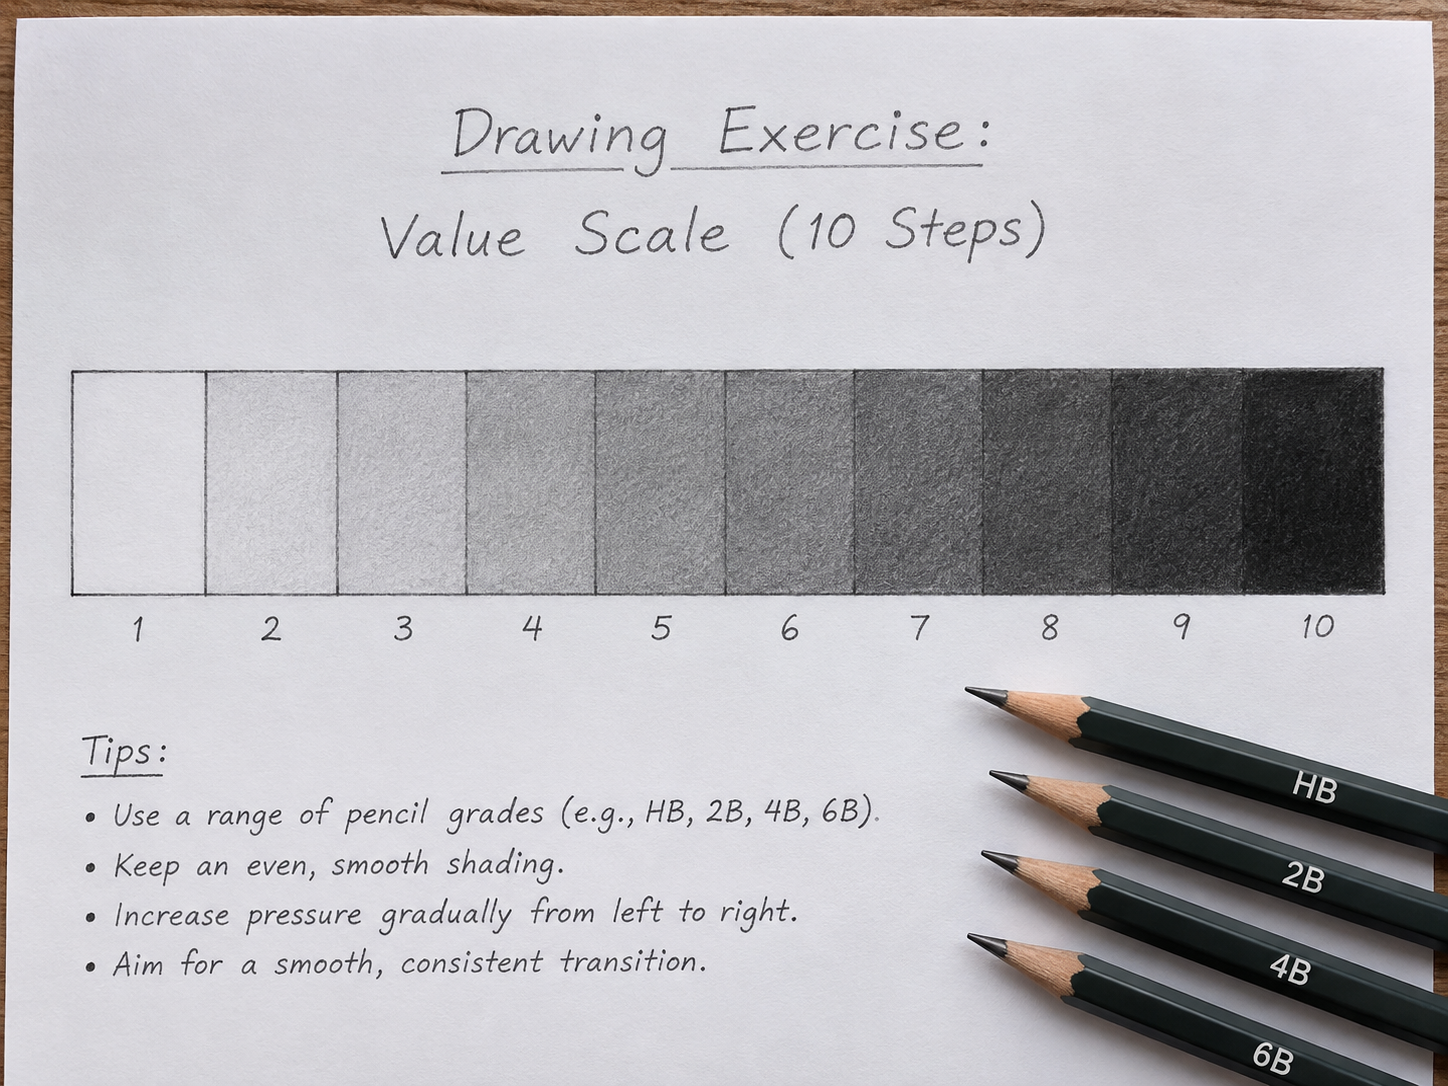
Beginner Exercise: Create a Graphite Value Scale
Draw ten adjoining rectangles on a piece of paper.
Leave the first rectangle white and gradually make each successive rectangle darker until the final rectangle is as dark as you can achieve.
Try using different pencil grades while controlling your pressure.
The goal is to create a smooth progression from light to dark.
This exercise teaches one of the most important drawing principles: value control.
2. Kneaded Erasers: Much More Than an Erasing Tool
A kneaded eraser is one of the most versatile materials in a realistic drawing kit.
Unlike conventional rubber erasers, kneaded erasers are soft and mouldable, resembling putty.
You can stretch, fold, flatten, and reshape them to suit different drawing techniques.
But their most valuable feature is that they can lift graphite from the paper with relatively little abrasion.
What Is a Kneaded Eraser Used For?
Kneaded erasers serve several purposes.
1. Lightening graphite
If a shaded area becomes too dark, gently press the kneaded eraser against the graphite to lift some of it away. The harder you press, the more graphited, creating a lighter area. You can repeat the process to remove more graphite.
This allows you to adjust the value without completely removing your drawing.
2. Creating highlights
You can shape the eraser into a small point and use it to lift graphite from selected areas.
For example, when drawing a portrait, you can create subtle highlights on the bridge of the nose, forehead, and cheekbones.
3. Correcting construction lines
Kneaded erasers are especially useful for reducing the visibility of your initial sketch without completely eliminating the guidelines.
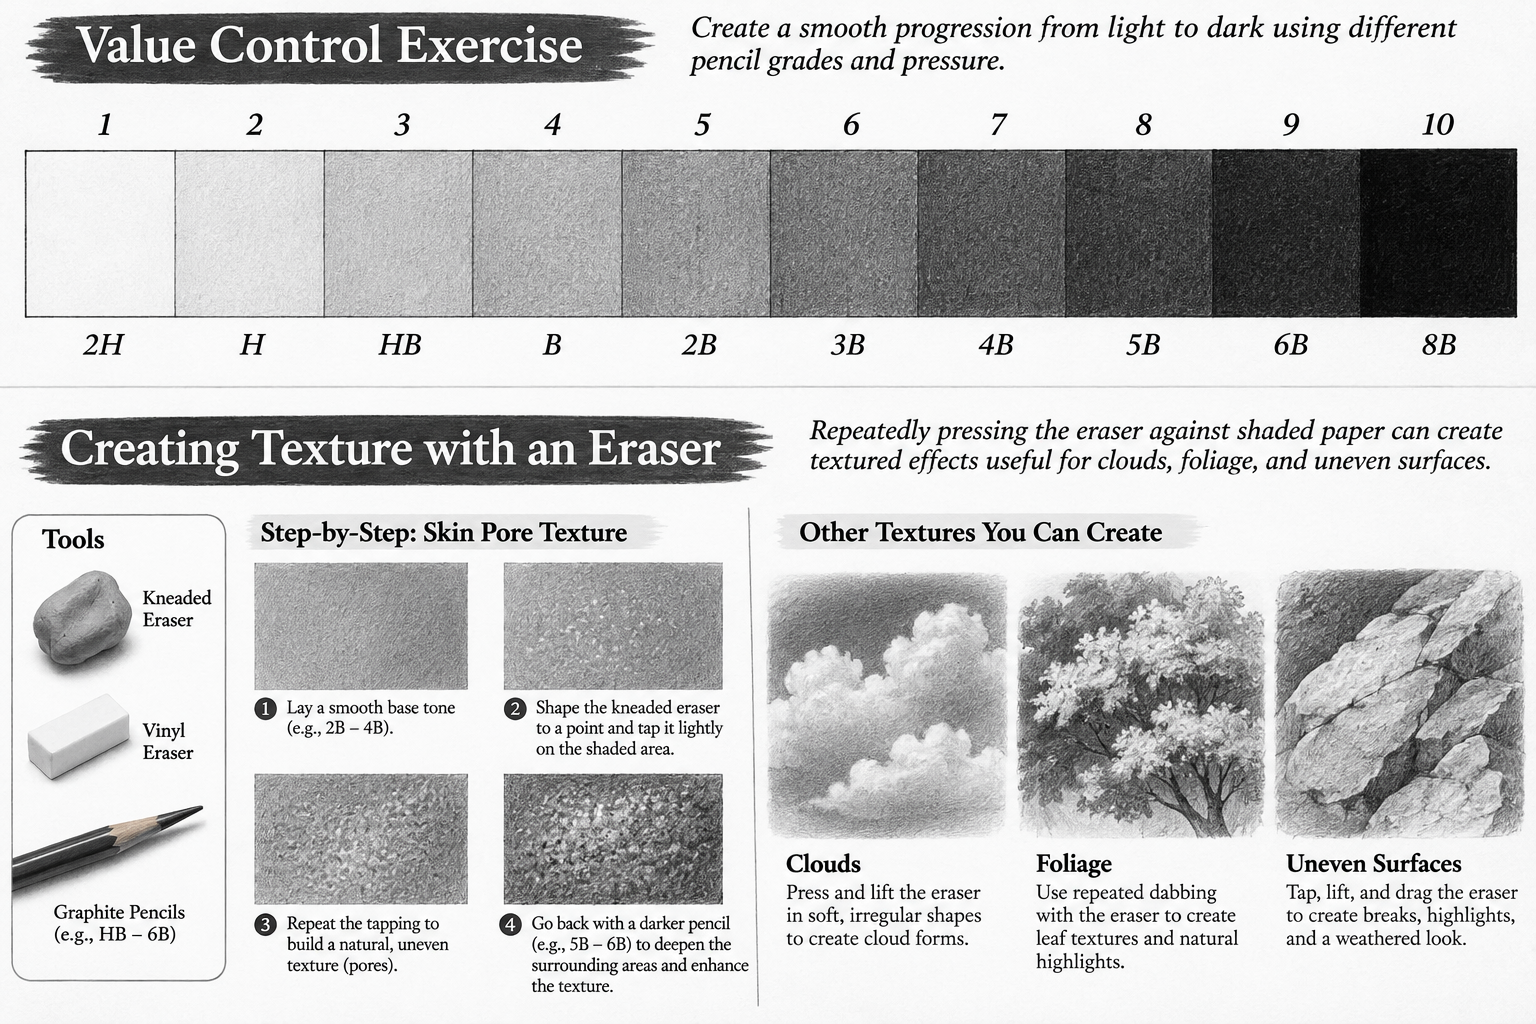
4. Creating texture
Repeatedly pressing the eraser against shaded paper can create textured effects useful for drawing clouds, foliage, and uneven surfaces. For detatiled skin pores, for example, shape the kneaded eraser into a point and tap it around the surface you want to create that texture, then go back and darken areas around the circles.
How to Shape a Kneaded Eraser
Different shapes produce different effects.
A pointed tip is useful for small highlights and narrow details.
A flattened edge can lift graphite from broader areas.
A rounded surface can create soft, diffused highlights.
You can also roll a kneaded eraser across shaded paper to gradually lighten an area.
Common Beginner Mistake
Avoid rubbing a kneaded eraser aggressively across the paper.
Instead, use a gentle lifting or dabbing motion, especially on delicate drawing paper.
As the eraser accumulates graphite, stretch and fold it to expose a cleaner surface. Replace it when it becomes excessively dirty or stops lifting effectively.
Practice exercise: Shade a rectangle using a 4B pencil, then use a kneaded eraser to create five highlights of different sizes and shapes.
3. Soft Drawing Brushes: Blending and Controlling Graphite
Many beginners associate paintbrushes exclusively with painting.
However, soft brushes can also be useful for graphite drawing.
A clean, dry brush allows artists to gently distribute loose graphite and soften transitions between shaded areas.
This can be particularly valuable when creating realistic portraits, smooth backgrounds, and subtle tonal effects.
How Does a Brush Work With Graphite?
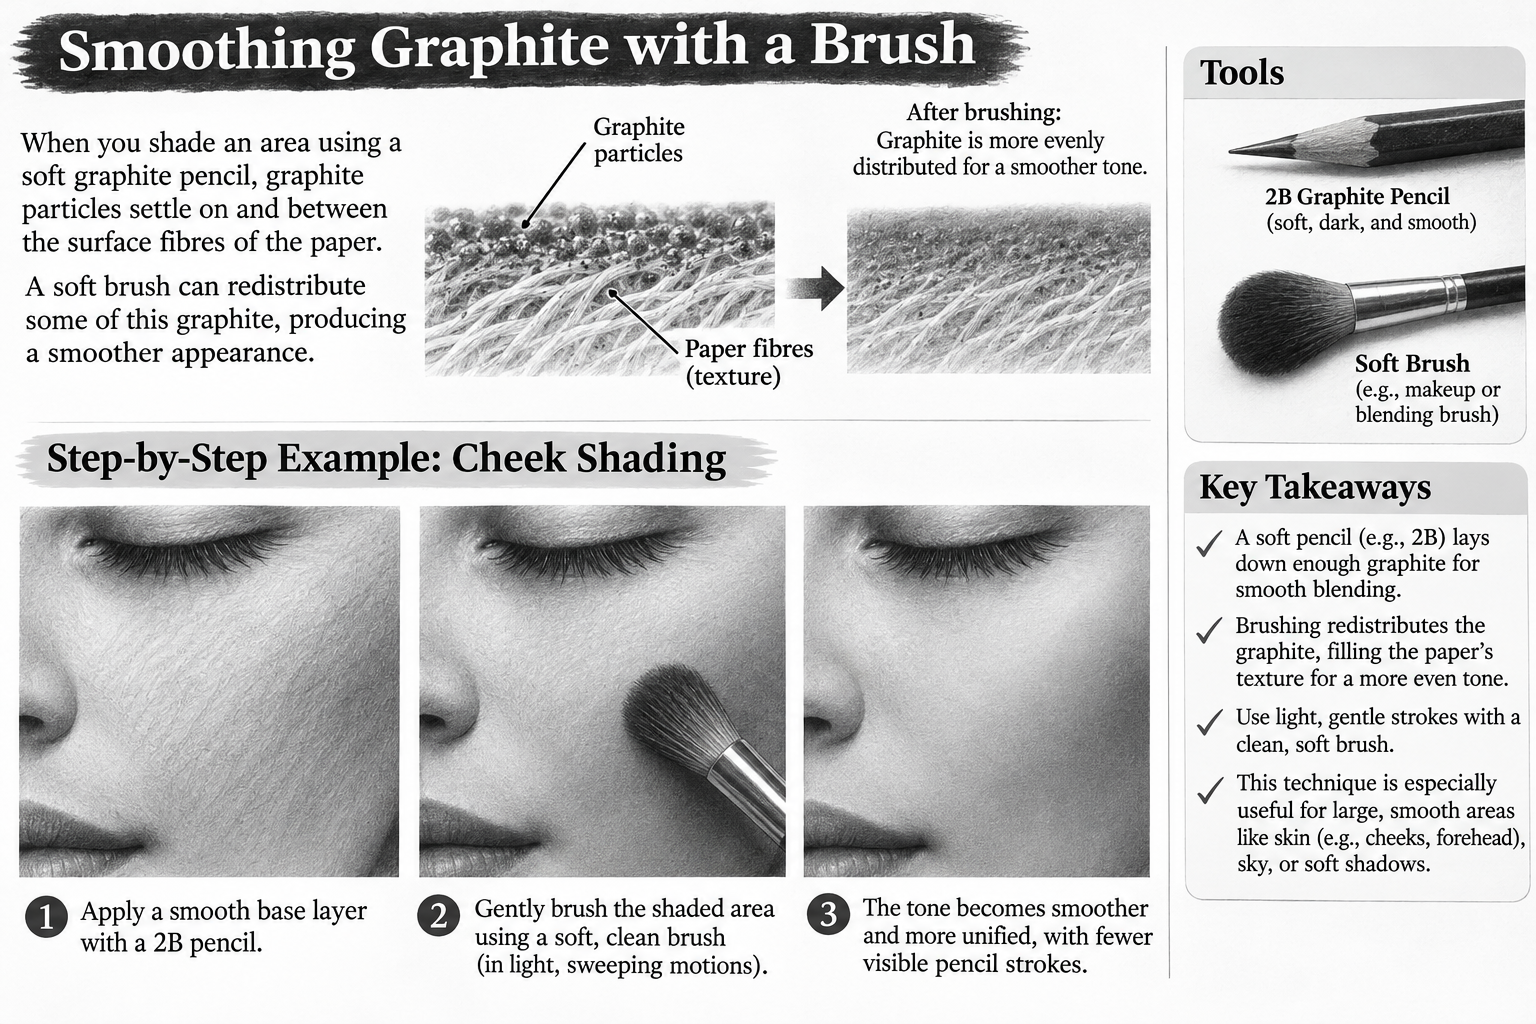
When you shade an area using a soft graphite pencil, graphite particles settle on and between the surface fibres of the paper.
A soft brush can redistribute some of this graphite, producing a smoother appearance.
For example, when drawing a face, you might shade the cheek using a 2B pencil and then gently brush across the shaded area.
This can reduce visible pencil strokes and create a more unified tone.
When Should You Use a Drawing Brush?
Brushes can be useful for:
Softening broad background shadows.
Creating subtle tonal transitions in portrait drawings.
Distributing small amounts of graphite over larger areas.
Removing loose graphite particles and debris, provided the brush is clean.
The Importance of Brush Cleanliness
Always check your brush before using it on a drawing.
A brush carrying dark graphite can accidentally transfer pigment into an area intended to remain light.
Consider keeping separate brushes for light blending and darker graphite work.
A Warning About Over-Blending
Smooth shading does not automatically make a drawing realistic.
Realistic drawings need controlled edges, convincing values, accurate proportions, and appropriate textures. So, you shouldnt blend every part of the drawing because it would appear flat or blurry. It is important to maintain soft transitions, while also leaving other areas crisp with deliniated boundaries.
For example, the gradual shadow across a cheek may benefit from soft blending, whereas the edge of an eyelid or a sharp cast shadow may require greater definition so that it stands out more.
Practice exercise: Draw three shaded circles. Leave the first unblended, gently blend the second with a clean soft brush, and blend the third using controlled pencil layers without a brush. Compare the results.
4. Mechanical Pencils: Precision and Fine Detail
Mechanical pencils are useful for artists who need consistent, controlled lines.
Unlike conventional wooden pencils, a mechanical pencil uses replaceable graphite leads that are released through a metail tip.
Because the lead maintains a consistent diameter, mechanical pencils are excellent for detailed work like fine pores, lines and stippling, dots.
What Are Mechanical Pencils Best For?
Mechanical pencils are especially useful for drawing:
Fine facial details: Small eyelashes, eyebrow hairs, and other delicate features.
Architectural sketches: Straight lines, detailed shapes, and controlled construction drawings.
Technical illustrations: Precise outlines and repeated line weights.
Detailed textures: Fine strands of hair, small patterns, and closely spaced marks.
Understanding Mechanical Pencil Lead Sizes
Mechanical pencils are available in different lead diameters.
Common sizes include:
Lead diameter
Common drawing use
0.3 mm
Very fine details
0.5 mm
Detailed sketching and precise lines
0.7 mm
General-purpose sketching
0.9 mm
Stronger lines and looser drawing
These sizes describe the lead's diameter, not its hardness.
A 0.5 mm mechanical pencil, for example, can contain different graphite grades depending on the refill.
How to Avoid Breaking Mechanical Pencil Leads
A common beginner problem is extending too much lead beyond the pencil tip causing it easily break when pressed on paper- avoid doing this and only release the lead using shortm, gentle pressure. Avoid using a mechanical pencil like a soft wooden shading pencil. Its narrow tip can produce concentrated pressure and may indent the paper.
Practice exercise: Use a mechanical pencil to draw a small eye, concentrating on the outline, iris, eyelashes, and fine details.
5. Graphite Lead Refills: Understanding Lead Grades and Replacement
Mechanical pencils require replacement graphite leads.
These are usually sold in small plastic containers that protect the thin leads from breaking.
Choosing the Correct Lead Refill
There are two important things to consider:
Lead diameter: The refill must match the mechanical pencil's specified size.
For example, a mechanical pencil designed for 0.5 mm lead needs compatible 0.5 mm refills.
Graphite grade: Different grades produce different drawing effects.
HB is useful for general sketching, while softer B grades may be preferred for darker marks.
Not all mechanical pencil models can accommodate every grade or type of refill, so check their specifications.
Why Lead Quality Matters
Poor-quality refills may break frequently or deliver inconsistent marks.
Good-quality graphite leads generally offer more reliable performance.
However, any lead will break if too much pressure is applied.
For beginner artists, an HB refill is a practical starting point.
Once you're comfortable controlling line weight and pressure, experiment with softer leads.
6. How to Combine These Materials in One Realistic Drawing
Understanding each individual tool is important, but the real progress begins when you learn how to use them together.
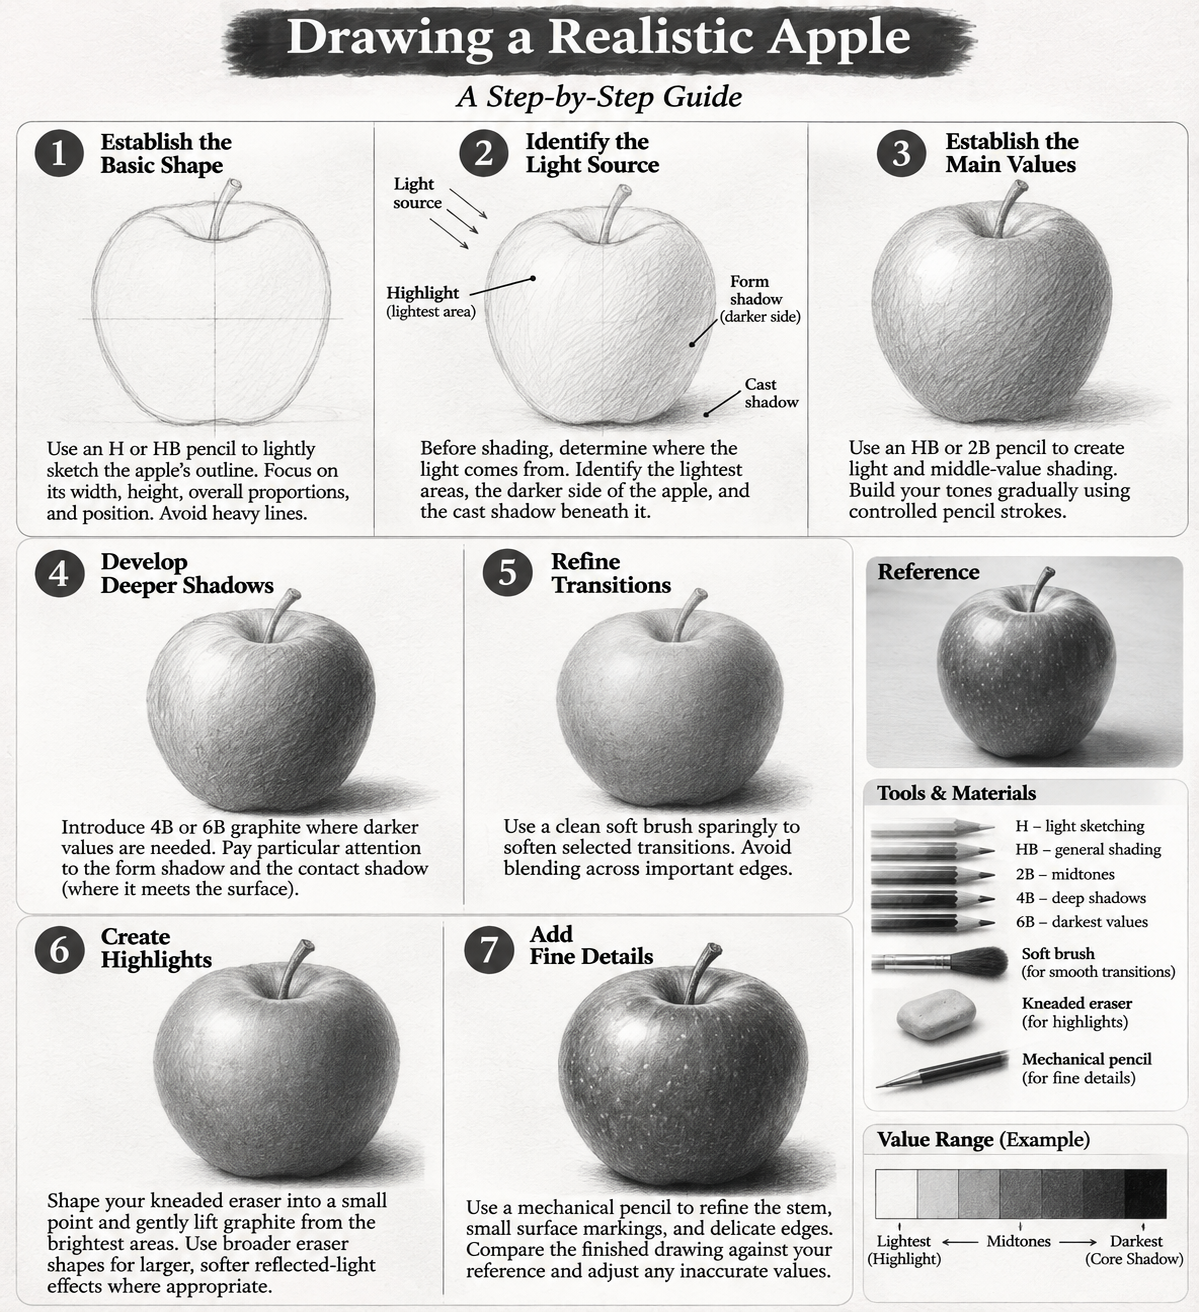
Let's consider drawing a realistic apple.
Step 1: Establish the Basic Shape
Use an H or HB pencil to lightly sketch the apple's outline.
Focus on its width, height, overall proportions, and position.
Avoid heavy lines.
Step 2: Identify the Light Source
Before shading, determine where the light comes from.
Identify the lightest areas, the darker side of the apple, and the cast shadow beneath it.
Step 3: Establish the Main Values
Use an HB or 2B pencil to create light and middle-value shading.
Build your tones gradually using controlled pencil strokes.
Step 4: Develop Deeper Shadows
Introduce 4B or 6B graphite where darker values are needed.
Pay particular attention to the apple's form shadow and the contact shadow where it meets the surface.
Step 5: Refine Transitions
Use a clean soft brush sparingly to soften selected transitions.
Avoid blending across important edges.
Step 6: Create Highlights
Shape your kneaded eraser into a small point and gently lift graphite from the brightest areas.
Use broader eraser shapes for larger, softer reflected-light effects where appropriate.
Step 7: Add Fine Details
Use a mechanical pencil to refine the stem, small surface markings, and delicate edges.
Compare the finished drawing against your reference image and adjust any inaccurate values.
By following this process, you practise observation, construction, shading, blending, highlighting, and detailed drawing within one exercise.
7. Five Common Drawing Mistakes Beginners Should Avoid
Even with good drawing materials, beginners often encounter similar difficulties.
Mistake 1: Pressing too hard during the initial sketch
Heavy outlines can become difficult to erase and interfere with later shading, so begin lightly.
Mistake 2: Using only one pencil grade
Although excellent drawings can be made with one pencil, experimenting with several grades helps you understand different tonal possibilities. Use H, for lighter, and B for darker shades.
Mistake 3: Over-blending
Excessive blending can destroy carefully constructed textures and soften edges that should remain sharp.
Mistake 4: Treating an eraser only as a correction tool
An eraser is also a drawing instrument. You can use it creatively to develop light, form, and texture.
Mistake 5: Focusing on details before proportions
Beautiful shading cannot fully compensate for inaccurate proportions.
Always establish the overall structure before working on individual details.
8. A Simple Seven-Day Practice Plan for Beginner Drawing Students
You don't need to spend several hours drawing every day to improve. Consistent, focused practice is more valuable than occasionally working for long periods without a clear objective.
Day
Exercise
Skill developed
1
Create graphite value scales
Pencil pressure and tonal control
2
Draw straight, curved, and parallel lines
Line confidence
3
Shade a sphere
Light and shadow
4
Practise lifting highlights with a kneaded eraser
Eraser control
5
Compare brush blending with pencil-only shading
Smooth transitions
6
Draw a detailed eye or leaf
Fine detail
7
Draw a realistic apple
Combining all techniques
Aim for approximately 20–30 minutes of focused practice each day.
Keep your exercises rather than throwing them away. Comparing earlier drawings with newer work is an excellent way to recognize your progress.
Final Thoughts: Learn Your Drawing Tools Before Buying More
Becoming a skilled drawing artist isn't about owning the most expensive materials.
It's about learning how to observe, control your pencil, build values, create convincing forms, and make deliberate marks.
A basic graphite pencil set, kneaded eraser, soft brush, mechanical pencil, and compatible lead refills give you a useful starting point for developing these skills.
As you progress, you may choose to explore additional materials such as blending stumps, precision erasers, graphite powder, and different types of drawing paper.
But there's no need to rush.
Start with simple subjects, practise consistently, and learn what each material can achieve.
The better you understand your drawing tools, the more confidently you'll be able to translate what you see into convincing, expressive artwork.
Looking to improve your drawing skills? Explore my beginner drawing tutorials, downloadable step-by-step guides, and practical drawing exercises designed to help you progress from basic sketches to realistic pencil drawings.
